|
General Information |
  
|
|
General Information |
|
This represents the main screen which is used when either adding a new report or when updating an existing report. When adding a new report, those items on the screen which contain default values (like file locations, etc.) are normally left at their default values. This screen allows you to upload files off your local hard drive (or network drive). One file being the actual Crystal Report itself ("Report File", with an "rpt" file name extension). The second file being the representative screen shot ("Preview File", with a "jpg" file name extension).
In addition, when posting a new report and/or updating an existing report it is always good to set the "Registration Status" to "Submitted". This will cause the system to re-validate/re-register the file to ensure current parameters are recognized, database connectivity works, resets the tables/views and columns used listings, etc.
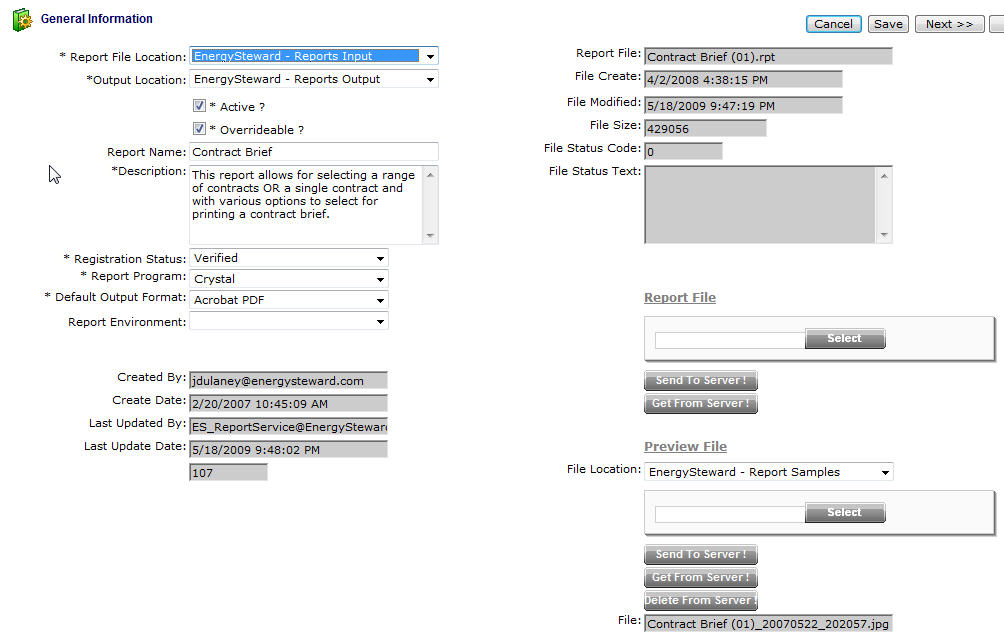
Report File Location (drop down list box) - This indicates the system name where the "Report File" (rpt) will be (is) located. When you upload the report file it will be stored on system servers within a specific path, referenced by this name. Most of the time this should be left at it's default location. The 'behind the scenes' paths assigned to these names are setup by system administrators.
Output Location (drop down list box) - This indicates the system name where the output for the report (when submitted and run by users) will be located. When a report gets run, it generates an output file (like a PDF or XLS file), it will be stored on the system servers and specific path, referenced by this name. Most of the time this should be left at it's default location. The 'behind the scenes' paths assigned to these names are setup by system administrators.
Active (checkbox) - If checked, then this report is viewable within report folders and tabs (adhoc menus). If inactive, then it is still in the inventory of the system but it is not available to be run. This should be considered instead of physically deleting a report.
Overrideable (checkbox) - If checked, then this report can be replaced by new versions of the same report if published within a maintenance agreement from EnergySteward.com. If un-checked, then it freezes the report from automatic updates from vendor upgrades, etc. Normally, this is left checked unless you have specific CUSTOM reports which require a high level of protection. This allows to get any updates/fixes to existing reports (if checked).
Report Name - This is required and is the name of the report as it appears in the menus. Many times, the underlying Crystal Report file ("rpt") does not reflect the correct terminology that users of the report might want to use for a report. This name is what is used. It is best to try and make sure this name matches the report title which prints when a a report is run.
Report Description - This is required and is a brief textual description of what the report covers. This also lists on the reporting menus to help users pick the correct report. Care should be taken to make sure the information listed is relevant to the report and would be something that would help users of the reporting menus in their selections.
Registration Status (drop down list box) - This indicates the status of the report within the system. When adding or changing a report, it is always good to set this status to 'Submitted' prior to saving and exiting. This ensures that the system reporting service will re-evaluate the report and post new parameters, etc. By doing this, it also confirms database connectivity settings within the report, etc. The possible values and what they mean include:
| • | Submitted - This indicates that you have marked this report for registration. A background task will pick any/all 'Submitted' reports up and attempt to register them. This can take a few moments from the time you set the status. |
| • | Verifying - This indicates that the background report registration service is currently running (verifying) this report. |
| • | Verified - This indicates success. Once a report is verified, it is available in the menus, the parameter list has been updated. The tables/views and columns used information has been made current, etc. |
| • | Failed - This indicates a failure with the registration process. Failures are typically related to how you have your database mapping setup (locations within the Crystal report file) AND how those locations map to the report configuration database mapping entries. |
Report Program (drop down list box) - This is required. Currently, the only option is 'Crystal'. This setup to potentially enable other report writer integrations in the future.
Default Output Format (drop down list box) - This is required. When a report gets selected by a user, to be run, it allows for them to override the type of output (examples include Acrobat PDF, Excel, Word, Text,etc). This allows you set what the default output format will be (recognizing that a user can override these when they submit a report). It is recommended that 'Acrobat PDF' be used here for all non tabular type reports.
Report Environment (drop down list box) - This is optional. This selection is relevant when you have multiple instances of a certain type of database which the report is setup to run against. If an environment is set here, then when a user submits a report they will be asked to 'pick' which environment they want to run the report against. This allows for a single report to be 'pointed' to multiple databases depending on what the user is attempting to accomplish with his/her report request.
For example, you could have an 'East Coast" and a "West Coast" database. These environments would have been defined by a system administrator within the report environment configuration area and have appropriate database mappings. The report inventory item could then be setup to use the "East/West Environments" (environment type). Then when a user runs a report (from the adhoc menus) they will have to select either "East Coast" or "West Coast" from a drop down list at the time they submit. When the report runs, it will dynamically point to whichever environment selected.
Report File (file upload area) - This is where you upload the Crystal "rpt" file. Here are the steps:
| 1. | Click the "Select" button. |
| 2. | A file explorer box pops up. Find the "rpt" file on your local drive or network drive, then select ok. |
| 3. | The file name (with local path) will be grayed out, yet appear in the box to the left of the "Select" button. |
| 4. | Click the "Send To Server" button. |
| 5. | This uploads the file to the appropriate server location (see "Report File Location" description above). |
| 6. | Notice the file size, date/time stamp, file name, etc. in the protected area at top right of the screen. It will reflect this files information. |
Preview File (file upload area) - This is where you upload the screen shot (jpg) image of some sample output. Here are the steps:
| 1. | Click the "Select" button. |
| 2. | A file explorer box pops up. Find the "jpg" file on your local drive or network drive, then select ok. |
| 3. | The file name (with local path) will be grayed out, yet appear in the box to the left of the "Select" button. |
| 4. | Click the "Send To Server" button |
| 5. | This uploads the file to the appropriate server location (see "Report File Location" description above). |
| 6. | Notice the file name gets a date/time stamp suffixed when it is stored, this is normal and ensures uniqueness. |
Important Note: You can always RETRIEVE the current report file or preview file by selecting the "Get From Server" button (Crystal "rpt" report file OR the "jpg" report preview file).