|
Volume Routing Details |
  
|
|
Volume Routing Details |
|
The screen below is accessible from the deal meter/well dashboard and allows you to browse AND update the routing/scheduling instructions. EnergySteward.com includes a separate online set of screens for routing/scheduling. The following screen operates the same way as the separate deal routing/scheduling screen. EnergySteward.com allows this additional option for updating volume routing instructions just for the meter/well being updated, thus providing a quick routing mechanism while working with the details of a specific meter/well.
The following screen shows, by production day, the volume routing instructions for the deal meter/well (within the selected production month and for the selected volume type).

Purchase/Receipt Volumes (click to select) Grid - This grid shows the various volume receipt points. By clicking on a grid item, the right side 3 grids will automatically refresh (posted volumes available transport/gathering points and available sale/delivery points). A left green arrow may be displayed to allow you to click and proceed backwards down the volume path.
Posted Volumes Grid - This will populate with existing destinations (transports, sales, etc.) for the selected receipt volume (left grid). An option exists here to hit the edit (pencil icon) or the delete (red x) icon in order to update or delete the route information.
Available Transport/Gathering Points Grid - This will populate with any 'available' transport or gathering points where the receipt volume (left grid) can be delivered. Click the route icon next to the segment where you wish to move volume. Important note: The icons will not be able to be pushed IF their is no remaining balance for the selected receipt item (left grid item selected must have an outstanding balance).
Available Sale/Delivery Points Grid - This will populate with any 'available' sales points where the receipt volume (left grid) can be delivered. Click the route icon next to the sales point you wish to move volume Important note: The route icon will no be able to be pushed IF there is no remaining balance for the selected receipt point item (leff grid selected item must have a balance).
Some relevant information regarding the routing/scheduling of volumes within EnergySteward.com :
| 1. | A delivery point on the same transport/gathering contract is a valid TO and/or DELIVERY destination for purchase/receipt volume (if route between the two have been setup on the contract and deal). |
| 2. | A receipt point on a different contract where the meter/well matches the meter/well you are transporting from (ie.. "Purchase Contract A / Meter #1" can have volume routed to "Transport Contract Q / Meter #1, etc.). Once the volume is put on the transport contract then the volume can move on the transport contract to different delivery points (dependent on route setup). |
| 3. | The origin of the volume is always tracked with the volume. No matter where the volume is routed, it can always be traced back to its origin. |
| 4. | Volumes can be split (half to one contract or sale, half to another, etc.). There are no limits on how many paths a volume can take at any given point. |
| 5. | Step '0' volumes are always the place where the volumes were brought on (original purchase meters/wells or the original receipt points (on transport contracts). |
| 6. | Step '1' is one route segment from origin, '2' is two route segments from origin, etc. You can tell relatively how far away a given volume is from its origin by looking at the step number for the routing instructions. |
| 7. | Volume balancing reports can be run to determine where any imbalances exist. |
| 8. | Purchase deals with WASP calculations are critical with the routing/scheduling function. |
| 9. | Volume adjustments are automatically calculated and deducted when routing volumes on routes with volume adjustment formulas. |
When you click any of the buttons from the routing screen (change posted volumes, delete posted volumes, post new transport/gathering, post new sale) then you will be presented with the following screen:
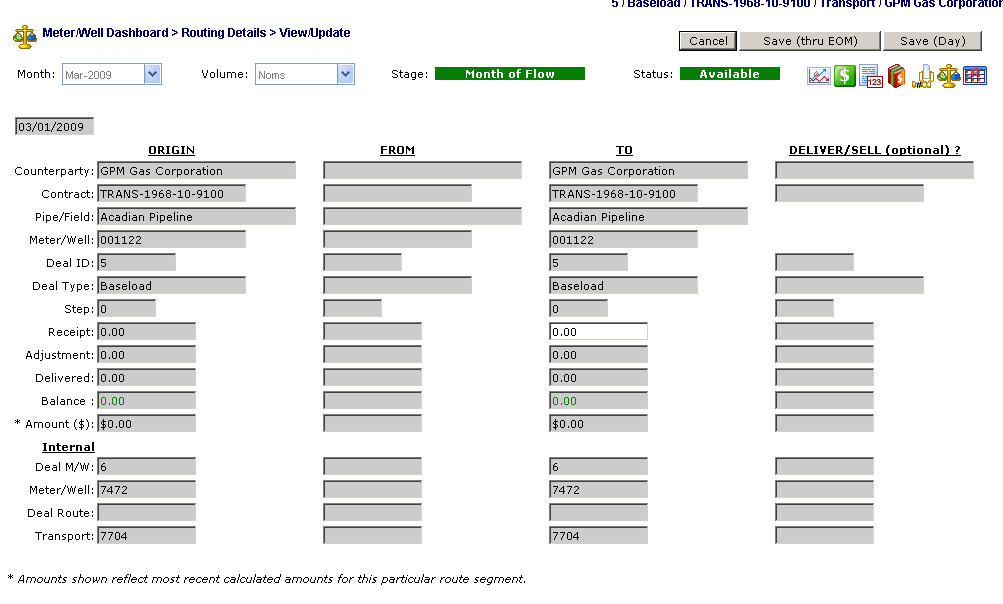
The above screen shot will show the origin of the volume (ORIGIN area), the most recent receipt point (FROM area) and the new target delivery point (TO area).
Receipt Volume (TO): - Use this field to enter the volume to be routed.
Force Outstanding Balances (checkbox) - When you check (select) this checkbox, then any outstanding balances (greater or lesser) for the current route on the current or any subsequent days will be used for the route.. For example: If you have 100 volume on each day but on last 3 days you have 110. If you are on day one and you select 100 as your volume to route AND check this checkbox. Then select 'Save (Thru EOM)'. All of the 100 volume days AND the last 3 110 volume days will have their entire outstanding balances routed (not limited to initial 100). This can be useful when you have varying daily volumes yet you want to make sure that all volumes on that day get the same route instruction.
Save (thru EOM) (button) - Click this button to save your volume routing instructions for the selected production day AND for all subsequent production days thru the end of the month.
Save (Day) (button) - Click this button to save your volume routing instructions for the selected production day only.