|
Member Distribution Preferences |
  
|
|
Member Distribution Preferences |
|
This screen lists out all of the individual contacts which are within the report schedule groups assigned. Here is where you can specify how the report is to be distributed when it runs on its schedule (email, fax, file copy to a folder, etc), for each individual across all report groups assigned.
The way you add individuals to this particular list, is strictly done by adding schedule group associations to the schedule report. The default distribution for all individuals is email.
Important note: An individual could possibly show up twice in this list IF that individual is in two groups and both are assigned to this scheduled report. In those situations it is a good idea to set one of the two, to not distribute at all (otherwise two copies will be sent). This can be done by going into one of the two distribution preference areas and unchecking all distribution options.
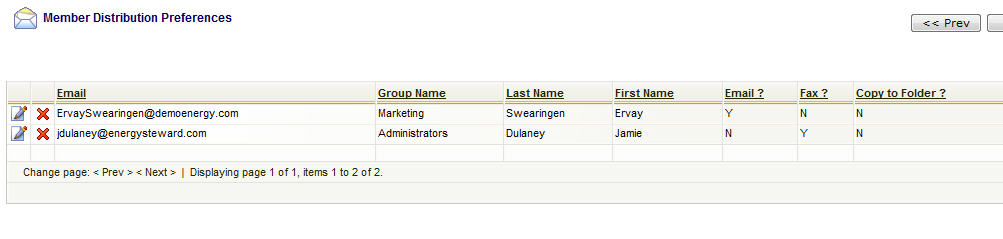
View/Edit Grid Button (pencil) - Click this next to the applicable individual contact in order to change/view the distribution options for this report.
Delete Grid Button (red x) - Click this next to the applicable individual contact when you want to permanently delete the distribution assignment to the scheduled report. This will not delete the scheduled report AND it will not delete the individual contact. Only the association between the individual and the scheduled report is permanently removed. You may want to consider simply un-checking the distribution options (versus a physical delete). Important note: You will be presented with a confirmation ("Are you sure...?") dialog box prior to deletion.
This following screen is displayed when you click the view/edit distribution option for a specific contact individual.
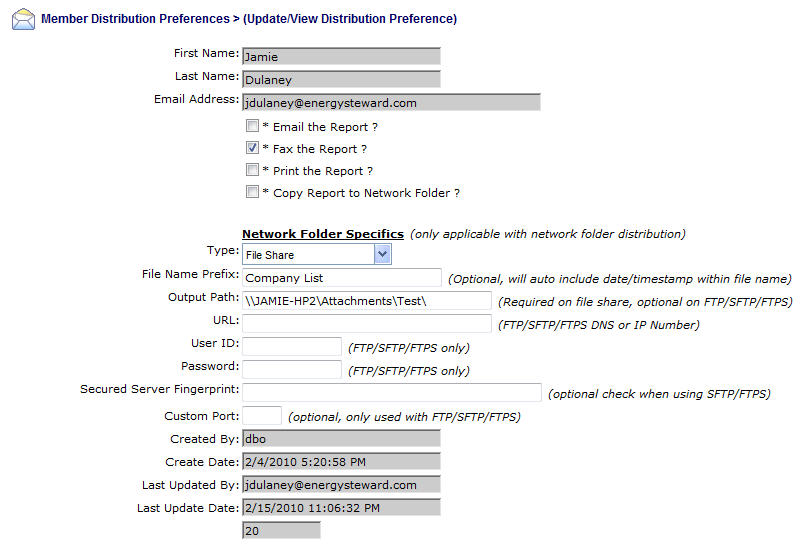
Email The Report (checkbox) - Check this to have the report sent via email. If the individual contact does not have a valid email address setup then the report obviously won't be delivered.
Fax The Report (checkbox) - Check this to have the report sent via fax. If the individual contact does not have a valid fax number setup (individual level AND company default level) then the report obviously won't be delivered. In addition, the fax service must be configured for this to be distributed.
Print The Report (checkbox) - No currently supported.
Copy Report to Network Folder (checkbox) - Check this in order to have the report copied to an available file share on network OR to have it sent via FTP/SFTP/FTPS to a remote network environment over the internet.
Network Folder Specifics (only if network folder distribution selected)
Type (pull down list box) - Include File Share, FTP, FTPS and SFTP.
File Name Prefix - This is an optional field. When entered it will name the file it copies with this prefix, followed by a date/time stamp within the name. As an example, if you want to write the report to a specific location always named "Demo Margin Report*.XLS'. Then you would enter "Demo Margin Report" in this prefix box. This ensures that everytime the report posts to the output location it will be named accordingly.
Output Path - This is a required field if you specify 'File Share' as a type. It indicates the specific file share location to post the report output file. If you select an FTP/SFTP/FTPS for a type then you can optionally specify the path (from the FTP root for the login).
URL - Required for any of the FTP types. This is the IP address or DNS name for the ftp site.
User ID - For FTP types, dependent on security setup at target site. This is the user id portion of the credentials to use in order to login and post to the site. Leave blank if anonymous site.
Password - For FTP types, dependent on security setup at target site. This is the password portion of the credentials to use in order to login and post to the site. Leave blank if anonymous site.
Secured Server Fingerprint - For secured FTP types, dependent on security setup at target site. If entered, then this value will be compared to the server value to determine if a connection and transfer can be made (ie.. value must match value presented at target server). Leave blank if you do not wish to ensure fingerprint checks.
Custom Port - For FTP site delivery only. If you want to override the default FTP/SFTP/FTPS ports then you can specify the port number to use for the FTP communication. Normally left blank.