|
Correspondence |
  
|
|
Correspondence |
|
Contracts within EnergySteward.com can have an unlimited number of electronic correspondence (attachments) associated to them. These correspondence items are stored with the contract on the EnergySteward.com servers and are readily available for quick online viewing, emailing, faxing. This correspondence feature provides for electronic backups of key contract artifacts (actual signed contract, amendments, supporting settlement related documents, etc.). Appropriate levels of security within EnergySteward.com makes these actual documents quickly accessible. More information about contract correspondence types can be found in the configure contract correspondence types area within this manual. Recording these correspondence options are optional, but if entered can provide multiple benefits. Important note: If you already have an electronic documents system to store your artifacts, then this area can store links to your external document system in order to associate these external documents to the contract.
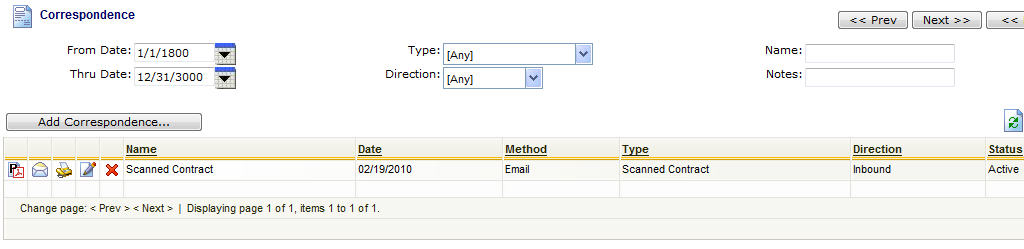
Add Correspondence (button) - Click this button to add a new correspondence item to the contract.
Correspondence Application (grid button) - This represents a graphic image of the type of correspondence which has been saved. This graphic image could represent a PDF report, Excel worksheet,Word document, etc. When you click this grid button you will be prompted to either open/view the correspondence OR to save it to a local or network drive. Basically, use this button to see the contents of the correspondence. When you click to open/view, then the application (Acrobat Reader, MS Excel, MS Word, etc.) on the client machine will be automatically started and the correspondence will appear when the application opens. Important note: If this is an external URL/Link to an document stored in a 3rd party electronic document system then you will see a GLOBE icon. When you click the globe it will fire off the URL so you can view the correspondence item from its external location.
Email Grid Button (envelope) - Click this next to the applicable correspondence item in order to send this item to someone in your contact list via email.
Fax Grid Button (facsimile) - Click this next to the applicable correspondence item in order to send this item to someone in your contact list via fax. Important note: This option only available if you have the faxing service activated.
View/Edit Grid Button (pencil) - Click this next to the applicable correspondence item in order to change any of the information relevant to the contract correspondence.
Delete Grid Button (red x) - Click this next to the applicable correspondence item that you want to permanently delete. When you delete a correspondence item, then all information relevant to that contract correspondence will be permanently deleted. Important note: You will be presented with a confirmation ("Are you sure...?") dialog box prior to deletion.
The following shows the correspondence detail which you are presented with when adding or updating contract correspondence.
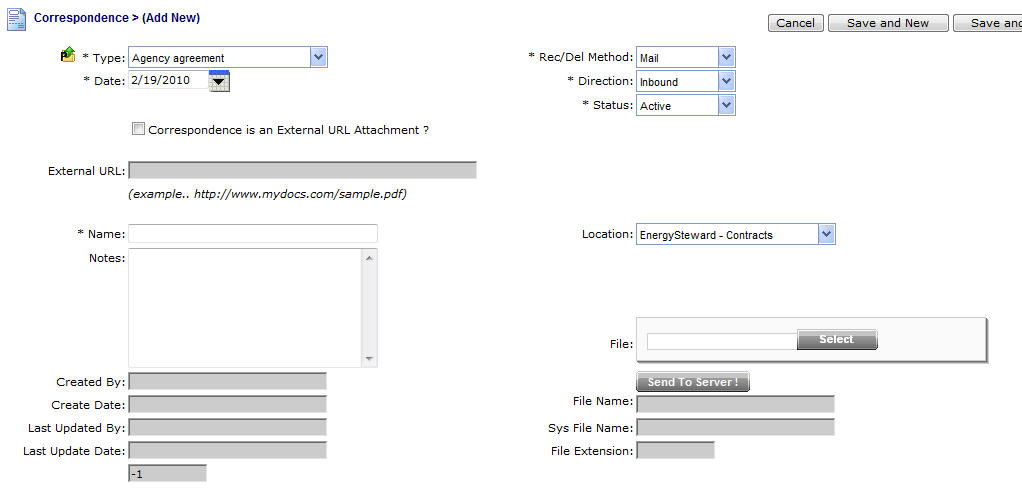
Type (drop down list box) - Select the correspondence type from the list of available types. See the configuration contract correspondence types area for creating/updating correspondence types. This item also includes a quick add icon for setting these correspondence types up directly from this screen (if you have appropriate security).
Date (popup calendar) - This is a required field and represents the date specific to the correspondence item (ie.. if you store a scanned contract then you would probably set this date to either the contract date OR the effective date).
Correspondence is an External URL Attachment ? (checkbox) - If this correspondence is a reference to an http or file URL (versus a physical file attachment) then check this box. When unchecked it means that you are planning on uploading a correspondence file/document.
External URL - This area is available to be entered if the "Correspondence is an External URL Attachment ?" is checked. If unchecked, this this field will be grayed out (non enterable).
Name - This is a required field. This is for posting a short name about what you are uploading (or setting up an external link).
Notes - This is optional and can be any related notes about the correspondence which is needed for clarification.
Rec/Del Method (drop down list box) - This is required and is used to indicate how this electronic correspondence was received or delivered. This is informational only.
Direction (drop down list box) - This is required and is used to indicate whether the correspondence was inbound or outbound. This is informational only.
Status (drop down list box) - This is required and indicates whether or not the correspondence item is active or inactive.
Location (drop down list box) - This indicates the system name where the "Correspondence File" will be (is) located. When you upload the correspondence file it will be stored on system servers within a specific path, referenced by this name. Most of the time this should be left at it's default location. The 'behind the scenes' paths assigned to these names are setup by system administrators.
Correspondence File (file upload area) - This is where you upload the actual electronic file. This file can be graphic image, PDF, Excel, Word, WAV (voice recording), etc. Here are the steps:
| 1. | Click the "Select" button. |
| 2. | A file explorer box pops up. Find the file on your local drive or network drive, then select ok. |
| 3. | The file name (with local path) will be grayed out, yet appear in the box to the left of the "Select" button. |
| 4. | Click the "Send To Server" button. |
| 5. | This uploads the file to the appropriate server location (see "Location" description above). |
| 6. | The sys file name and extension will appear (protected) directly underneath. |
| 7. | Make sure you save and/or exit (to save) once the upload has completed AND the other areas of the screen have been entered. |